Reception. The front desk.
Your menu: Dashboard, Patients, Schedule, Billing, Messages, Inventory, Follow-ups, Attendance, Accounts (Income, Expenses, Salary) and Reports. You never see clinical notes, prescriptions or clinical reports. This is intentional.
Register a patient
- Patients > the + button (New patient).
- Fill the three tabs: Personal (name, phone, gender, date of birth or age), Emergency and insurance, and Additional (referral source, referring doctor).
- If another patient already uses the same phone, you are shown them. A family can share one phone.
- Save. The patient gets a patient ID, for example
PT-00012.
Names are written in English letters, so they print and search the same everywhere.
Self-registration: patients can fill the form themselves from the QR code (the phone button next to New patient). Their forms wait at the top of Patients under "Self-registrations to check": Review and accept, or remove them. The form opens only once the centre's set-up is complete.
Book visits
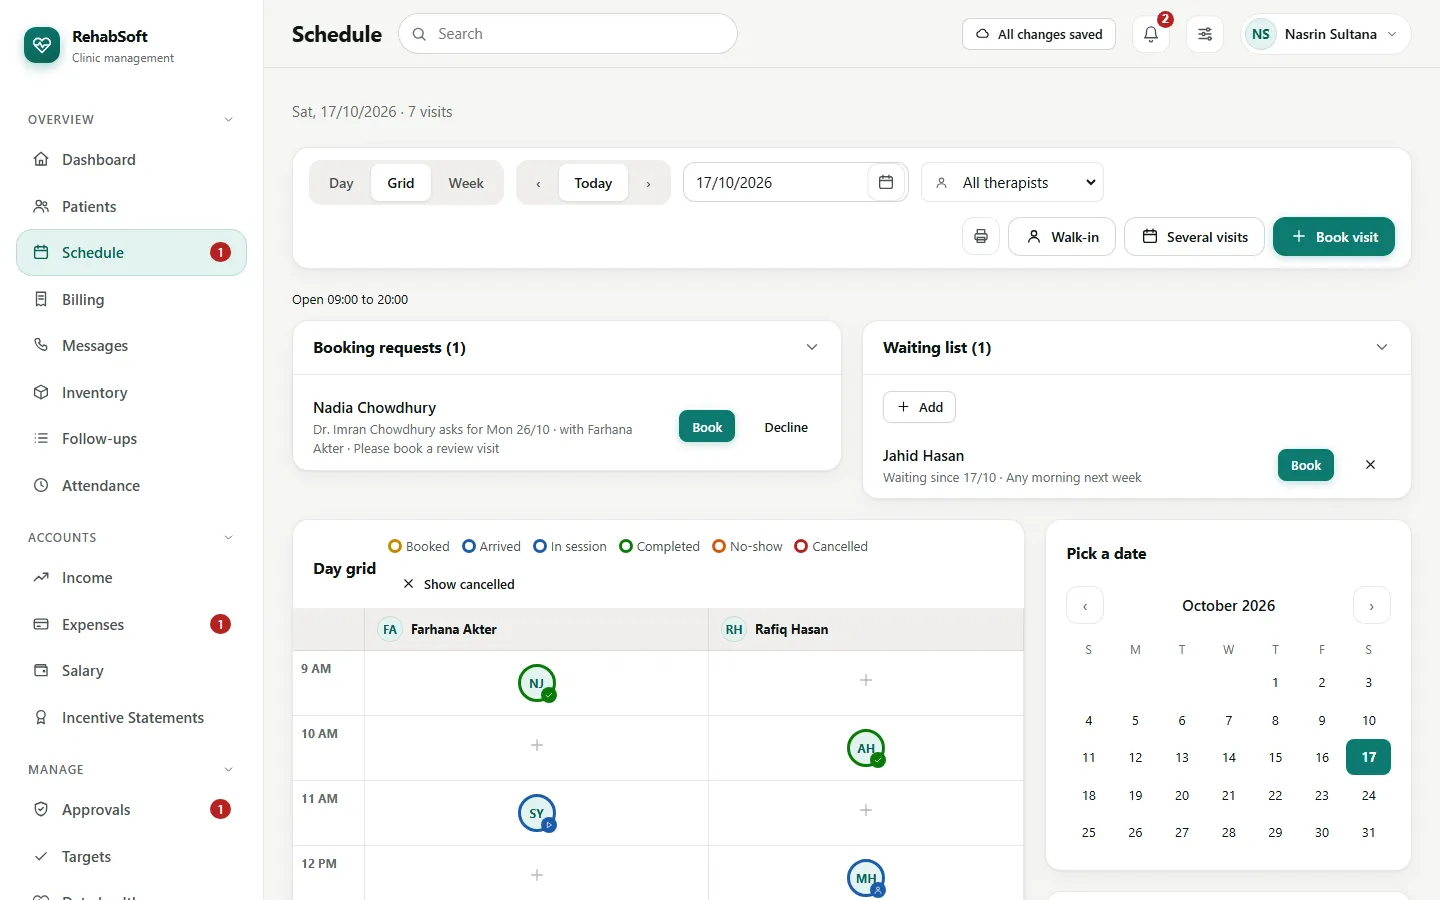
- From the patient page: Book visit (one visit) or Several visits (for example 3 days a week, 10 sessions, optionally against a package).
- From Schedule: Book visit, or Walk-in for someone who just arrived. In Grid and Week, click a free cell to book at that time with that therapist.
- If the therapist is already busy, outside their shift or on approved leave, you see a warning and must confirm. A full bed or room is refused.
- Requests from consultants, therapists and the portal wait under Booking requests in Schedule. Booking from a request closes it. The Waiting list sits next to it.
In Grid each visit is a round photo (or initials) with a ring: yellow booked, blue arrived, blue with a play mark in session, green completed, orange no-show, red cancelled. Click it for the patient, the time, the bed and the next button.
During the day
On Schedule > Day, each visit has its buttons:
Arrived when the patient comes in.
Start session when treatment starts. The time between the two is the waiting time the owner sees in Reports.
Complete at the end. If the patient has a package, choose it: one session is used.
Other buttons:
- Mark as no-show: only after the visit's day is over. It does not use a package session.
- Cancel visit: free, uses no session.
- Move to another time: the old time stays in the history.
- Change therapist: for a substitute.
- Fix a mistake: to correct a wrong step, for example a visit completed by mistake gives the session back.
The red warning at Arrived means the patient's due is above the owner's limit. It never stops you.
Print sheet prints the day's A4 sheet, one block per therapist.
Quick check-in with the patient card
Patient page > More > Print patient card prints a card the size of a bank card with the centre, the patient's name, ID and phone and a QR code. When the patient shows it, scan the code with any phone camera (or type the ID into search): the check-in page shows today's visits and one button for the next step, Arrived or Start session, with the dues warning if there is one.
Take money
- Patient page or Billing > New invoice.
- Add service for each line (package, single session, consultation) and choose the category.
- Add a discount if needed. A discount above your limit is sent to the Centre Owner and the invoice waits.
- Create invoice. Tick Pay the full total to take the payment at the same time.
To take a payment later: Take payment, choose the patient, amount and method (Cash, Mobile wallet, Card, Bank transfer, Cheque) and apply it to an invoice. Money paid before an invoice exists is kept as an advance.
- Print the receipt from Billing > Payments > Receipt. The first print is the original; later ones are marked as copies.
- A wrong payment, a refund or a waiver is never deleted. Ask through Send request; the Centre Owner decides.
- Billing also has the day book (cash count per day), companies, coupons and opening balances.
Dues from the old system
If your centre's invoices from an earlier system were loaded, the patient page shows Old system invoices with what is still due on each, and a warning at the top while anything is owed. Collect takes an old due with an ordinary numbered receipt, all at once or in parts. Billing > Old dues lists every patient with an old due, largest first.
Messages
- Booking confirmations, reschedule notices and the morning reminder queue on their own and go out within about a minute.
- To send one of the four ready messages (No-show follow-up, Package running low, Dues reminder, Birthday): Messages > choose the patient > choose the message, check the text shown, Send. Or use Send a text on the patient page.
- A failed text shows in red with Resend. A patient marked "do not text" gets nothing.
Accounts
- Income: money that is not patient billing.
- Expenses: enter a voucher with its heads and amounts; the Centre Owner approves and pays.
- Salary: the monthly pay list for your branch.
Inventory
In when stock arrives, Out when it is used. Only the Centre Owner adds items or corrects a count.